
The first thing you’ll need to do is book an appointment to register as an EU Citizen living in Spain.
When to book
In the most popular cities, appointments can be scarce, and waits can go up to a few months. We advise to book your appointment as soon as possible.
What you need to book
To book your appointment you will need:
✅ Your Passport
✅ Your Email
✅ A Spanish Phone Number that you have with you at the time of booking the appointment - They will send you a verification code
✅ To be in Spain - The website doesn’t work if you’re outside of the country
If you don’t have a Spanish Phone Number or want to secure your appointment while you’re out of the country, you can upgrade to our Dedicated NIE Support Package, and a Matutto Advisor will book your appointment on your behalf, and help you with your entire application.
How to book
1. If you have everything you need to book your appointment, go to this website, and follow the below steps:
2. Select the Province you’ll live in - This is where your appointment will be
3. In the next drop-down labelled Trámites Cuerpo Nacional de Policía select “Policía-Certificados de Registros de Ciudadano de la U.E.“. Then click “aceptar” to continue.
4. The page will refresh to show you a list of requirements for this appointment, which we have gone through above. Click “entrar” to continue.
5. Here you need to add your personal details. Please ensure the information is entered exactly how it is shown on your passport. Click “aceptar” to continue
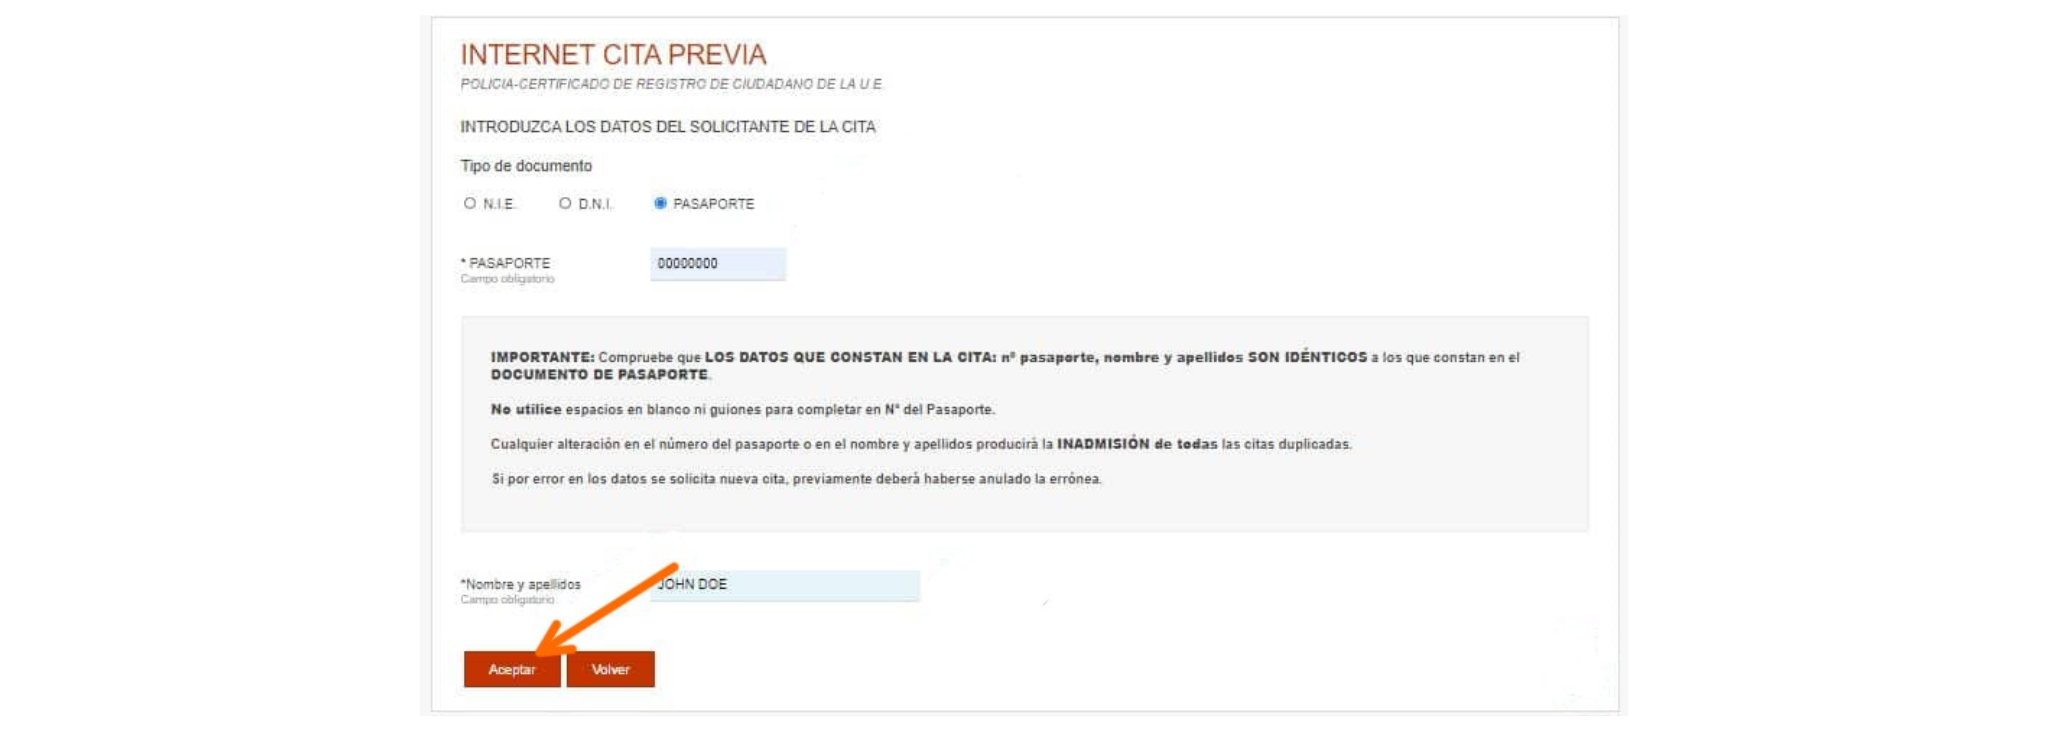
6. The page will then show 4 buttons. Click “solicitar cita”.
7. The next page you will have a drop down to select the office to have your appointment at. Once you have chosen a location, click “siguiente”.
Note: It can be hard to find a slot so don’t be too picky. You may need to try a few locations to see what has more availability. Don’t worry, you can always come back to this page.
8. If there are appointment slots available, they will show on the screen. Select your preferred date and time. The page will automatically reload.
Note: If there are no appointments available, the page will tell you “En este momento no hay citas disponibles. En breve, la oficina pondrá a su disposición nuevas citas” you can try checking another location or checking again another day.
9. Review all the information and make sure all is correct. A security code will be sent to the Spanish phone number given at the start – type the code in, tick the check boxes and click “confirmar”.
Congratulations! 🥳 Your appointment is confirmed. You will see your appointment code on the page - Save it, as you will need to show it on the day of the appointment. You should also receive an email with all the details.
If you cannot find appointments available
It can be hard to find availability, but don’t worry, if you’re persistent you’ll end up securing your spot too!
Slots normally get updated in the mornings (between 9 and 10:30AM) during the week. To increase your chances of securing a spot as soon as possible, check at this time every morning.
Need help with this? Our Advisors can book your slot on your behalf - Upgrade to the Concierge NIE Package and let our team do the work.
You need to pay a Tax Fee to the Government to get your NIE. To pay the fee, you will need to fill in a form online, print it, and take it to a bank. Here’s the instructions on how to fill in the form.
1. Go to this website to access the Form
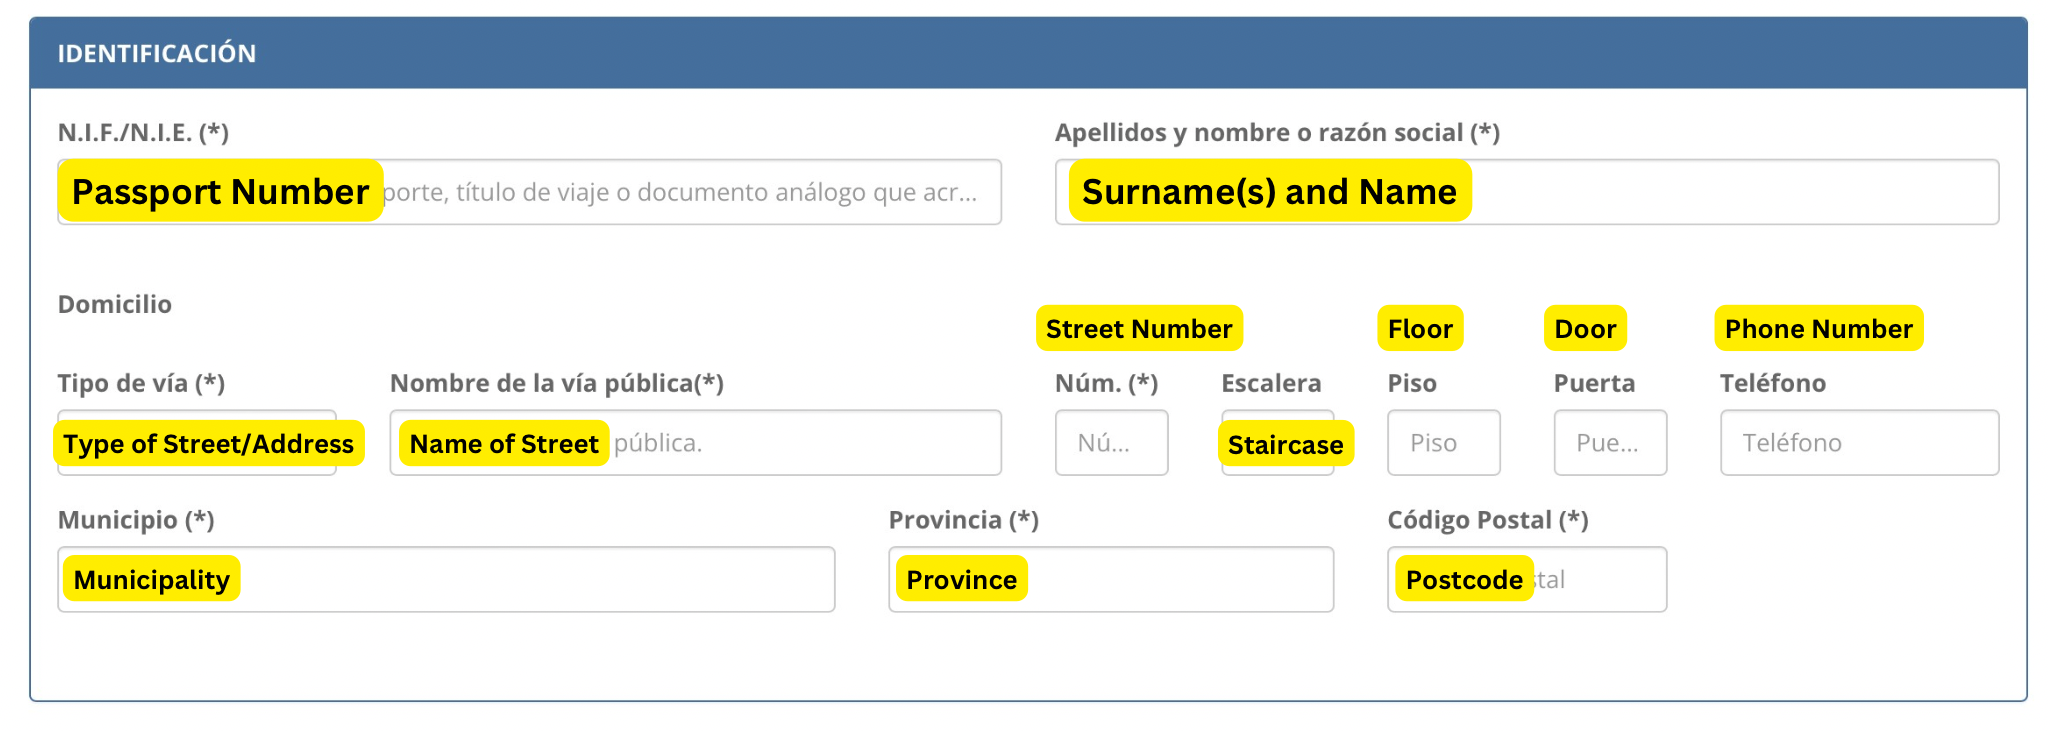
2. Complete the section “Identificación” with your personal details as follows:
Note: Only the fields marked with an asterisk (*) are compulsory
3. In the section “Autoliquidación” make sure “Principal” is selected. You can leave the rest empty.
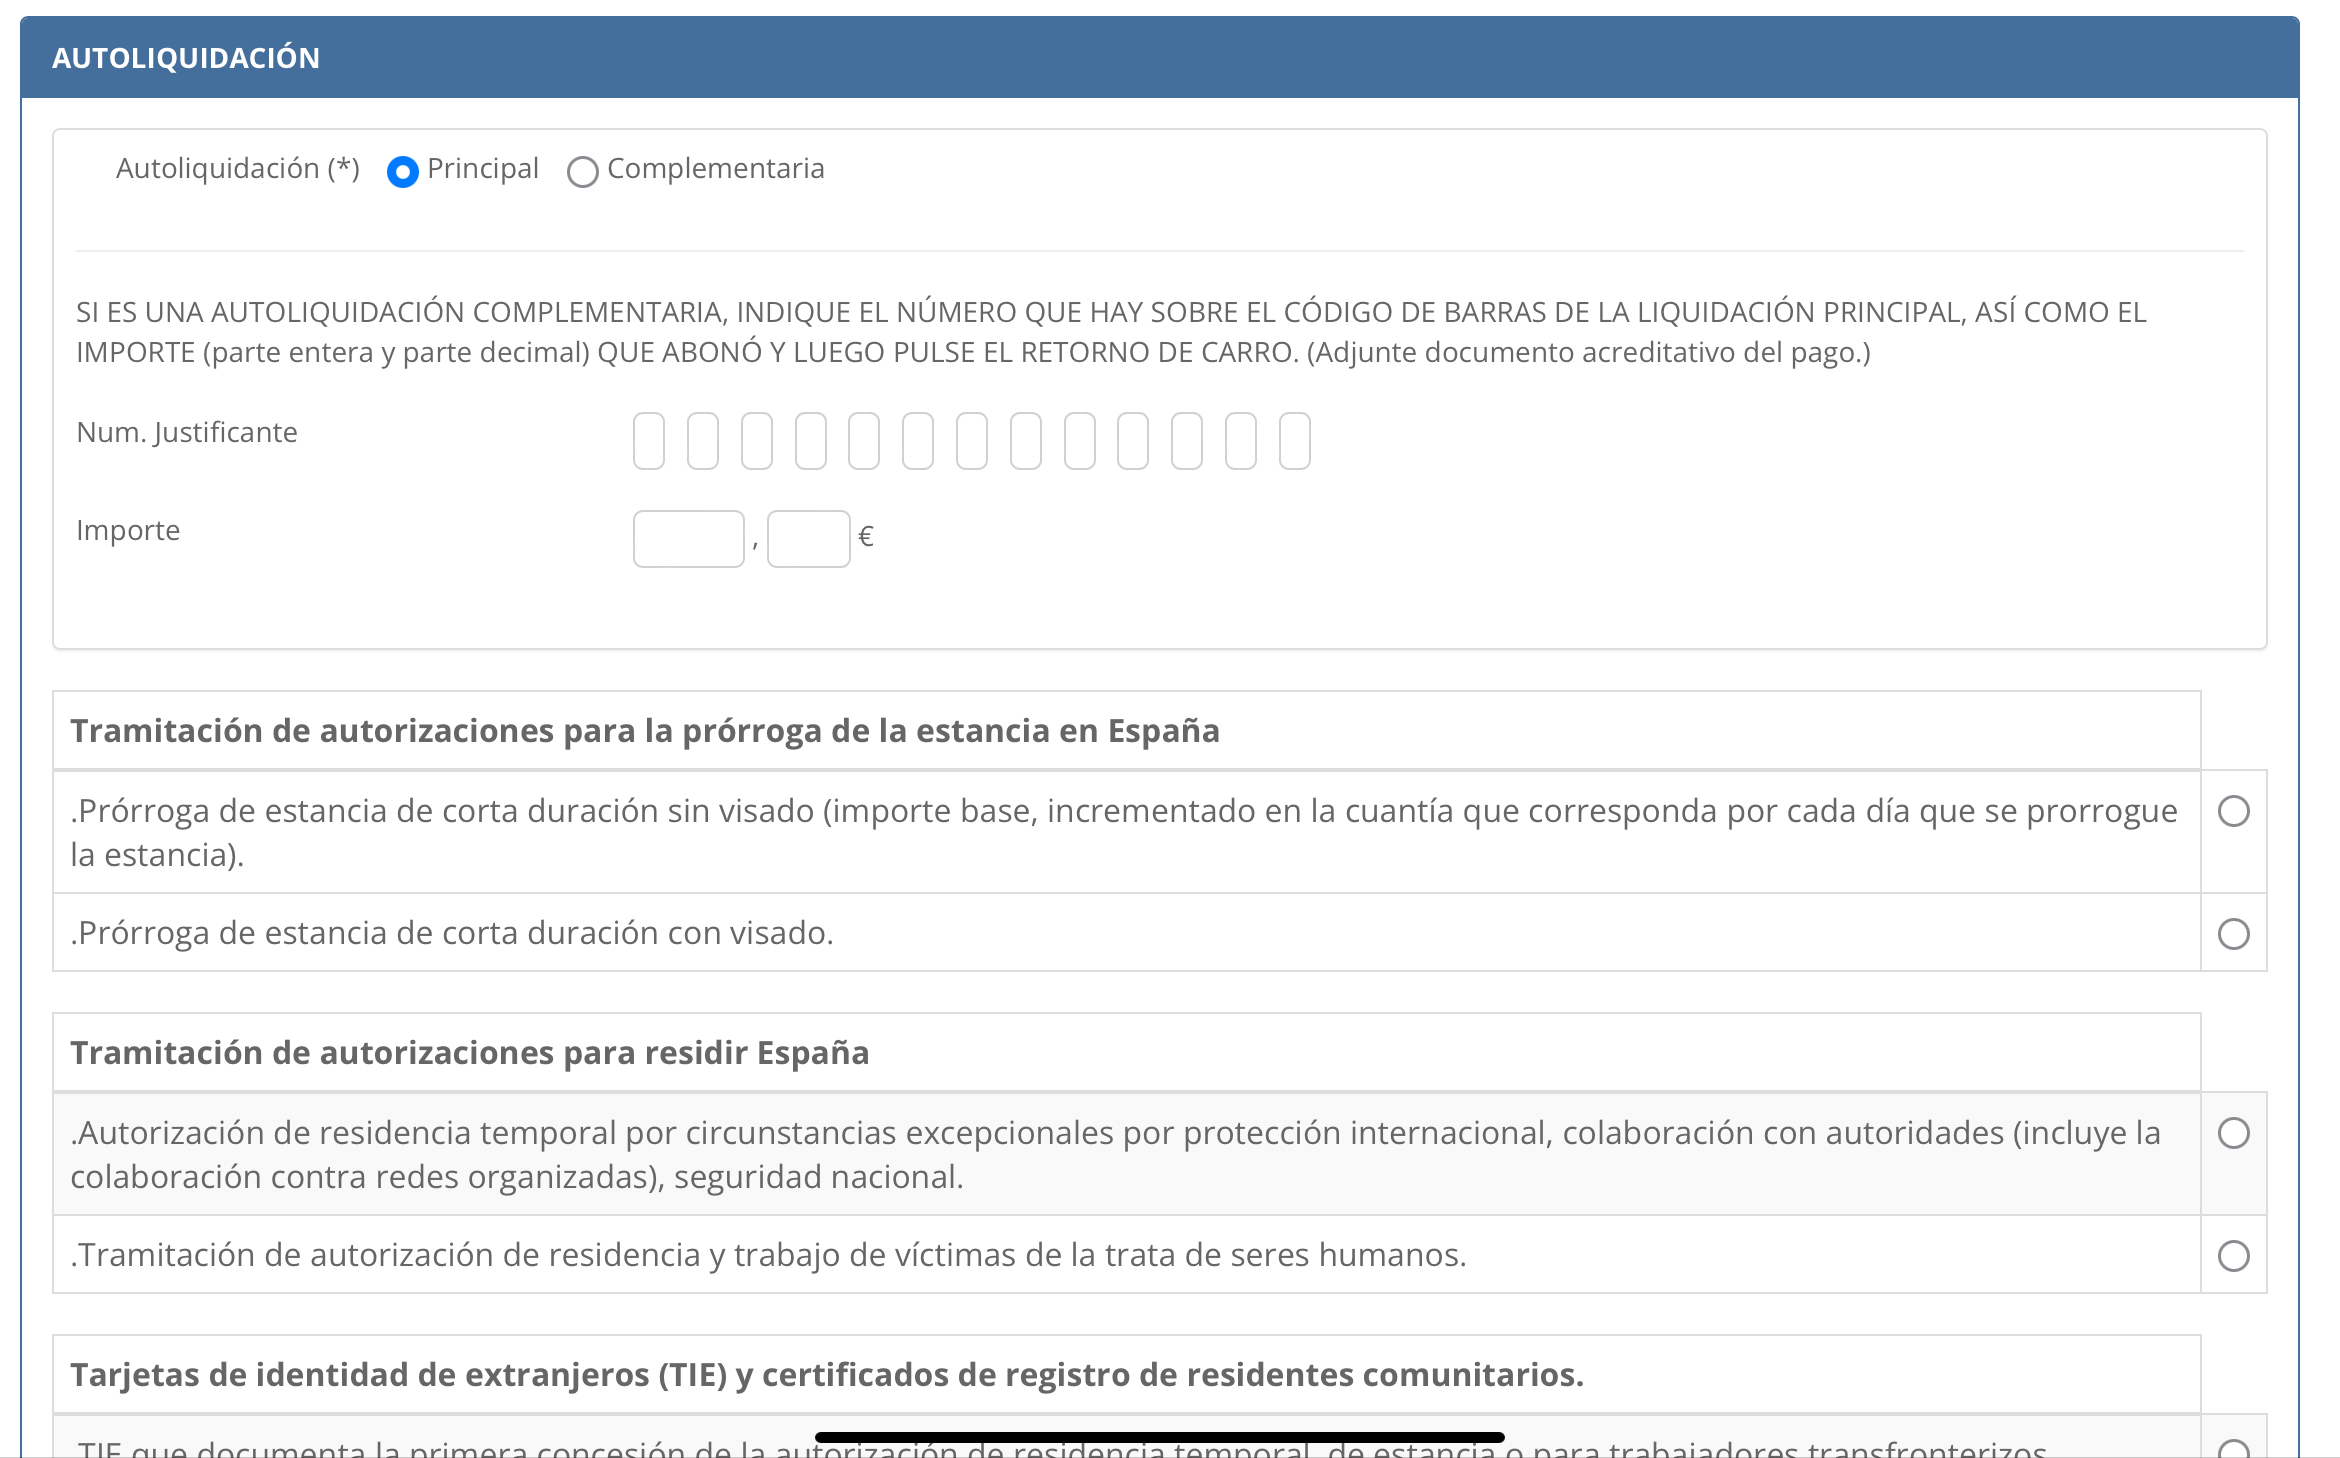
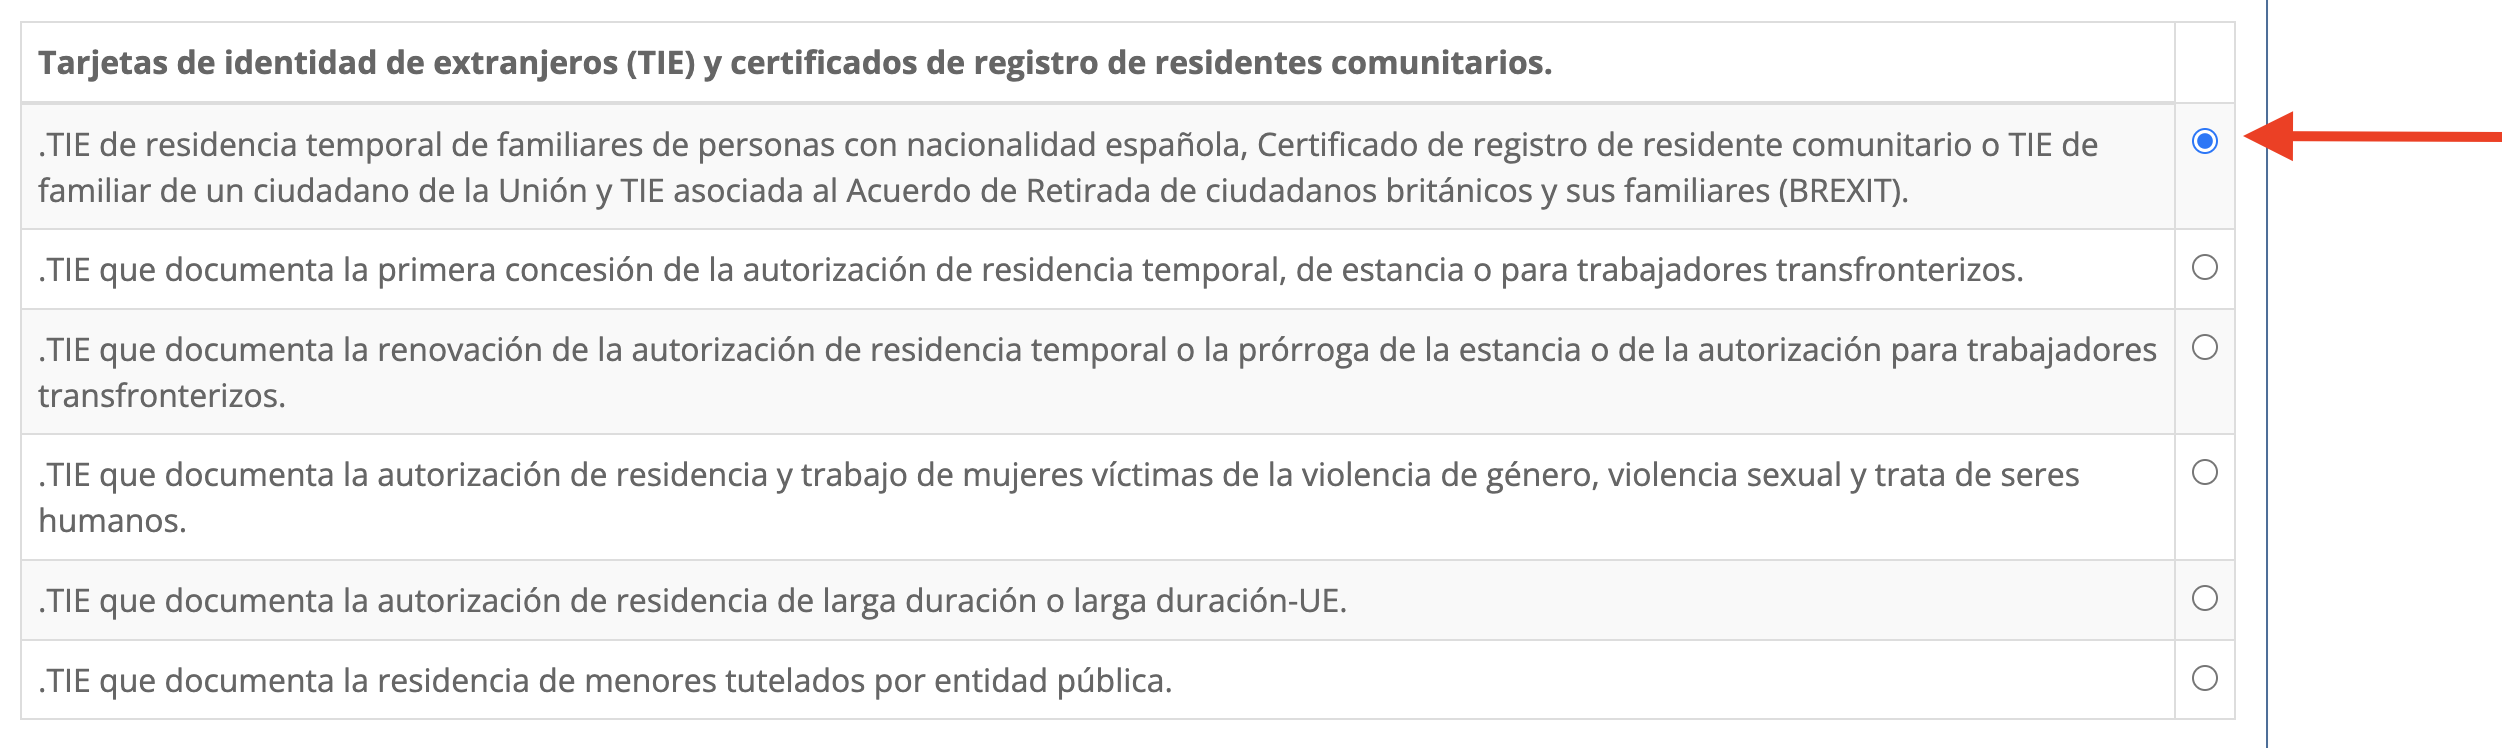
4. Scroll all the way until the section “Tarjetas de identidad de extranjeros (TIE) y certificados de registro de residentes comunitarios.” And select “.TIE de residencia temporal de familiares de personas con nacionalidad española, Certificado de registro de residente comunitario o TIE de familiar de un ciudadano de la Unión y TIE asociada al Acuerdo de Retirada de ciudadanos británicos y sus familiares (BREXIT).”
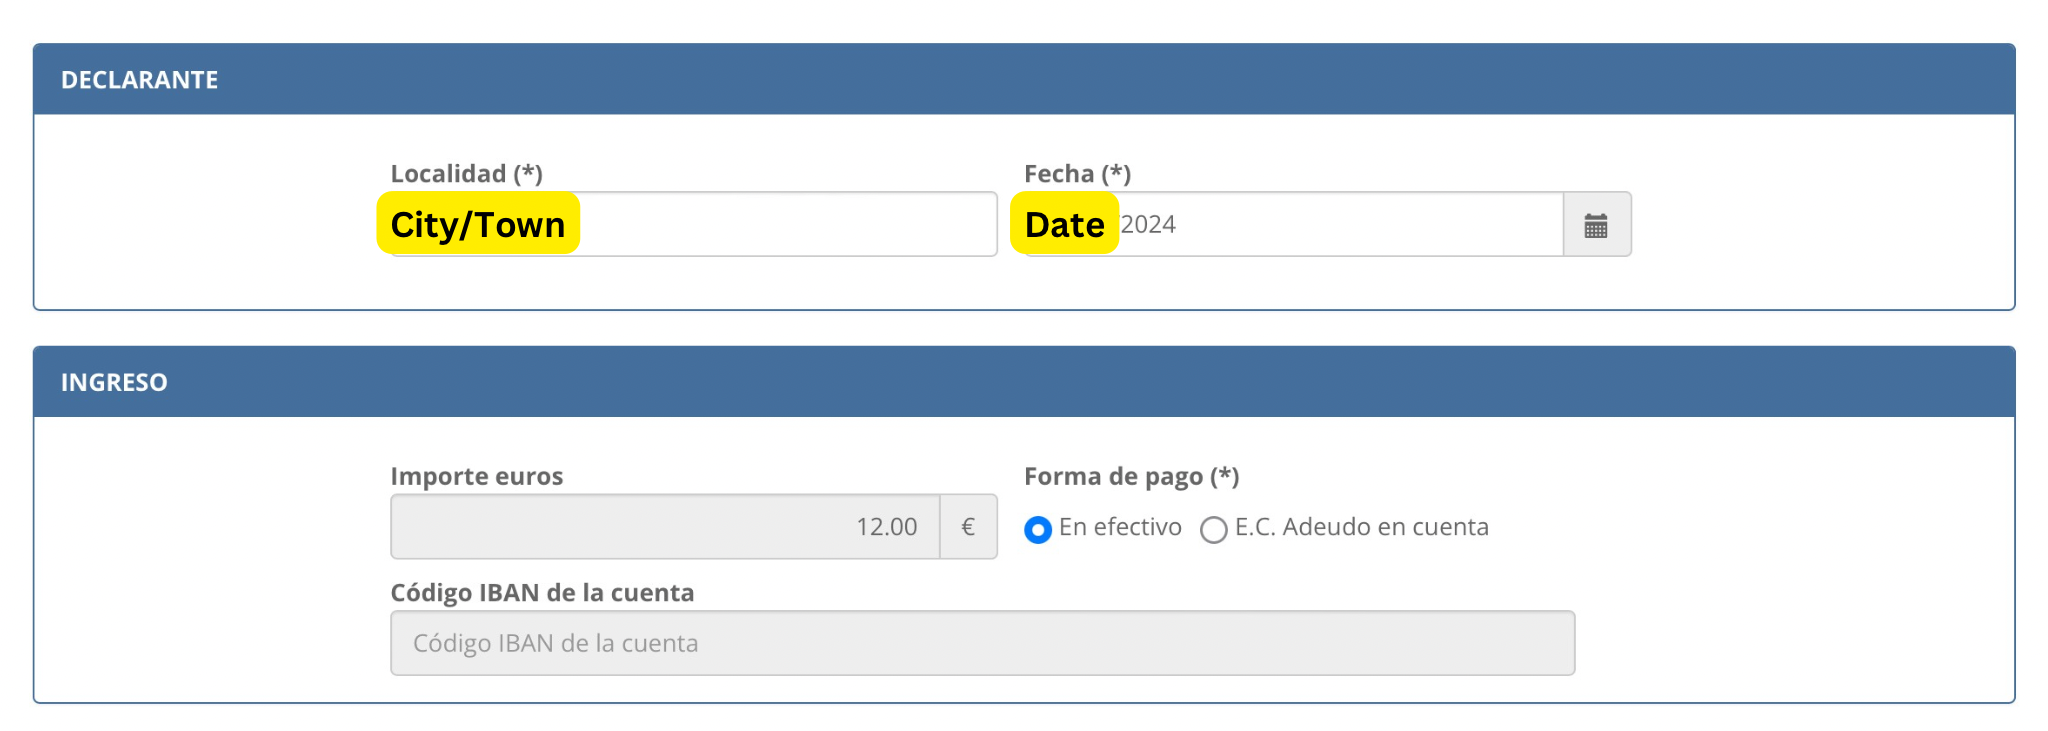
5. In the section “Declarante” write the name of the city or town you’re making the application in, in the section “Localidad”, and add the date in “Fecha” in which you’ll be paying the fee at the bank (See Step 3)
6. In the section “Ingreso” select “Efectivo”
7. Complete the captcha and click “Descargar impreso rellenado”
8. The page will download the filled form in your device - You’ll have to print it and take it with you to the bank (See Step 3)
Now that you have the Tax Form filled and printed, you will need to take it to a bank, to pay for the allocated fee.
What you need to take
✅ Your Passport
✅ The Printed and Filled Tax Form (Step 2)
✅ €12 in Cash, to pay for the Fee
How to find a Bank
Most bank branches (with an office) take this payment. You don’t need to be registered with the bank to do this transaction. Just look for “Banco” on Google Maps to see the ones near you and pay them a visit.
After you pay the Fee
The bank will provide you with a stamped document of two pages - Save this carefully, as you will need to take it with you to your NIE Appointment to prove that you paid for the Tax Fee.
You will also need to fill in the Registration Form, and take it with you for your appointment. Download the form, print it and fill it in following the below steps:
IMPORTANT: Fill in the Form in CAPS and with a Black Pen
1. Download the form here
2. Fill in Section 1) DATOS DEL SOLICITANTE with your personal details:

3. Leave Section 2) empty DATOS DEL REPRESENTANTE A EFECTOS DE PRESENTACIÓN DE LA SOLICITUD
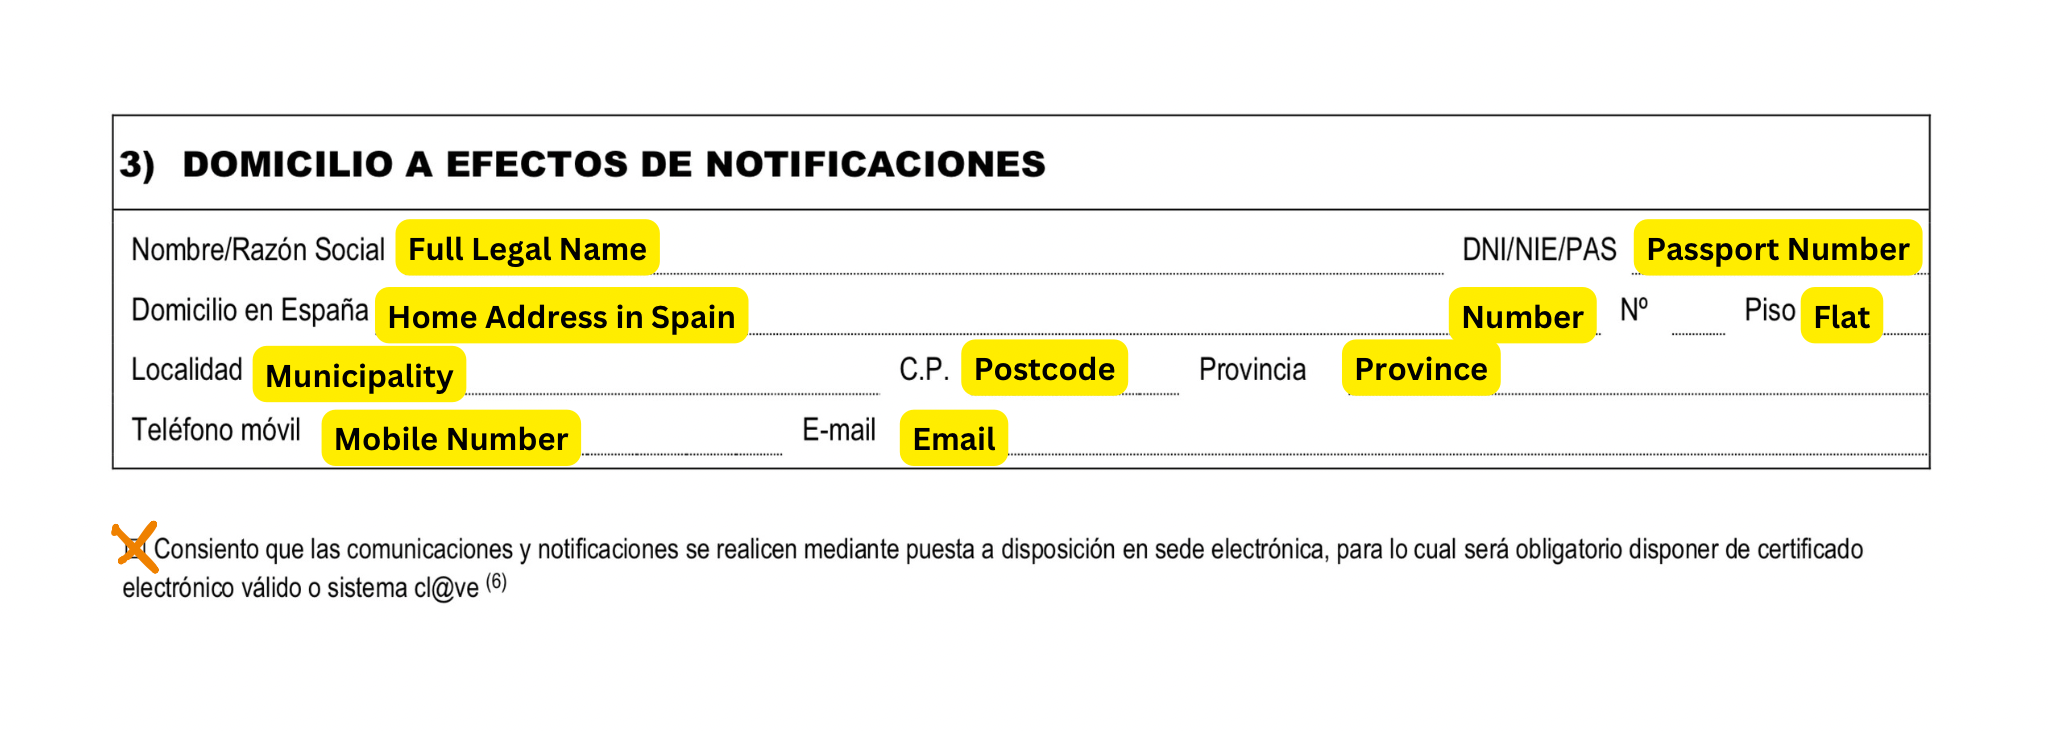
4. Fill in Section 3) DOMICILIO A EFECTOS DE NOTIFICACIONES with the address where you would like to receive notifications from the Government moving forward. You don’t need to write this if you would like to use the same address as indicated in section 1.
5. Mark with a Cross (X) the box underneath section 3) Consiento que las comunicaciones y notificaciones se realicen mediante puesta a disposición en sede electrónica, para lo cual será obligatorio disponer de certificado electrónico válido o sistema cl@ve - This is to indicate that you agree to receive notifications online via the Cl@ve Platform - We will help you get access to this in the next Stage
6. In Nombre y apellidos del titular write your Name and Surnames as per your passport
7. Fill in section 4) SITUACIÓN EN ESPAÑA with the details of your stay in Spain

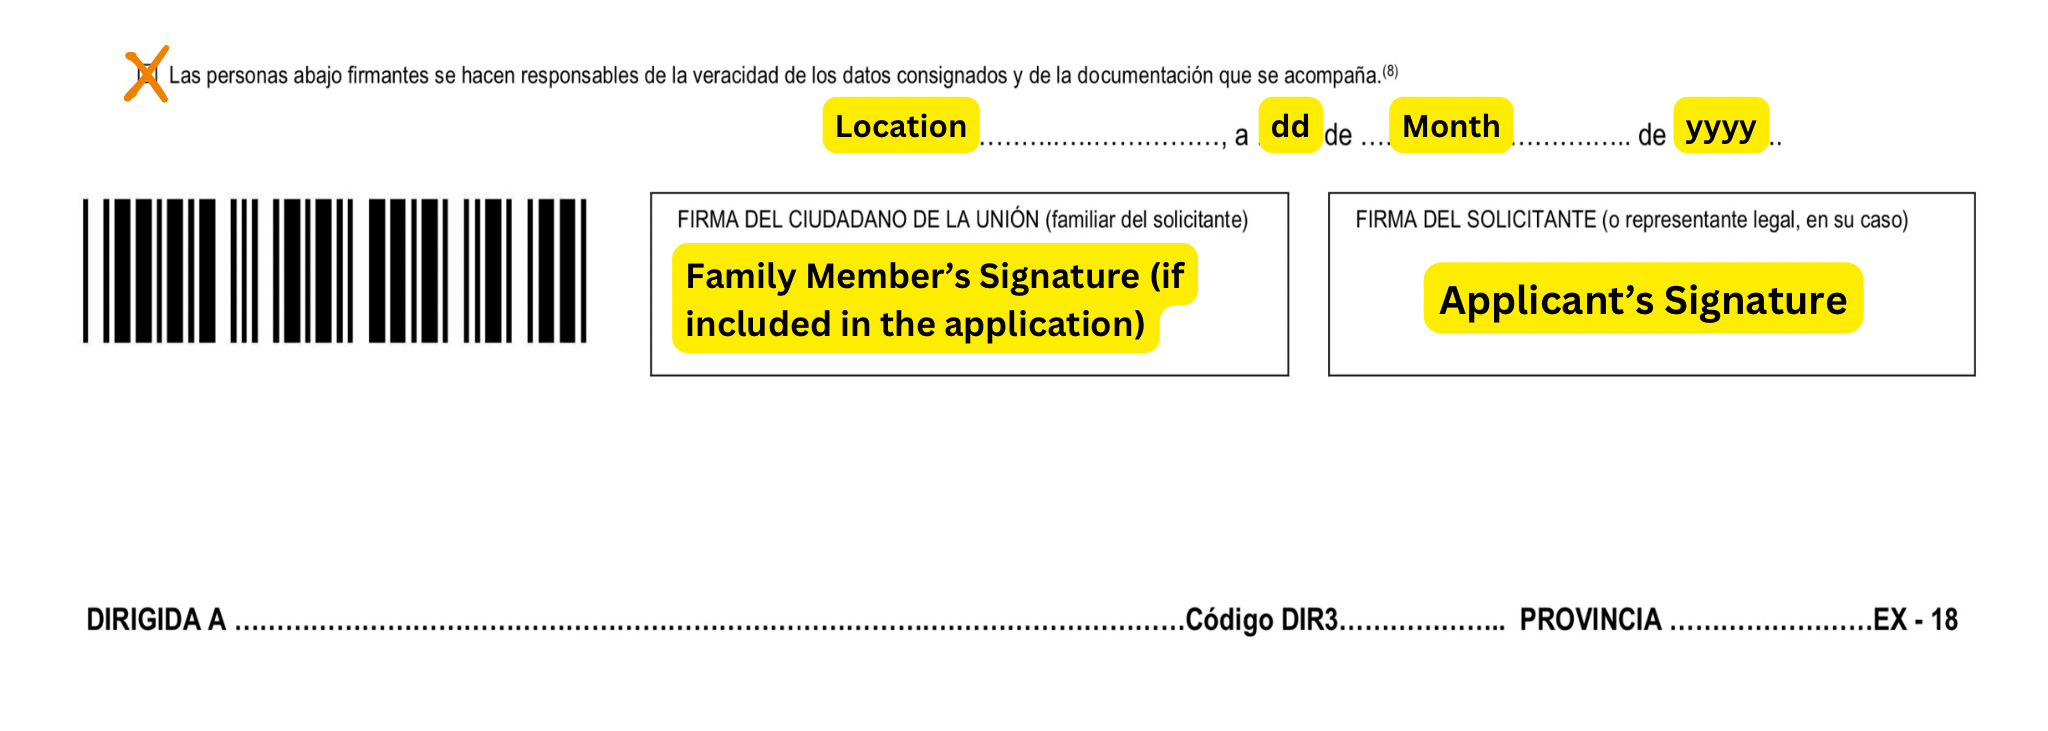
8. Mark with a Cross (X) the box underneath section 4) Las personas abajo firmantes se hacen responsables de la veracidad de los datos consignados y de la documentación que se acompaña. This confirms you’re responsible for the veracity of the information and documents provided during your application.
9. Fill in the below section with the location (city) and date in this order [City], a [day of the month], de [writen Month - see below list], de [year]. Here’s the list of months in Spanish:
10. Sign the form at the bottom, and you are done!
11. Make a copy of the form, as you need to take two copies for your appointment.
Before your appointment, make sure to have all the documents you need. Depending on the reason for your move to Spain, you’ll need to take different supporting documents for your NIE Application:
If you’re moving for work, as an Employee
If you’re moving for work, as Self-Employed:
If you’re moving as a Student:
If you don’t do any work or studies
If you are moving to join family
It’s time to attend your appointment! 🥳
Make sure to take all the documents you need (See Step 5)
If all is approved during your appointment, you will receive a green paper card - Save it carefully! This is your NIE, and will be your National ID during your stay in Spain.
